Processing , let’s give it a try !

Hi everyone and welcome to Clevotain. I have heard a lot about Processing for long time especially in the old Arduino projects and noticed it’s able to do really cool stuff. It could be because it was based on JavaScript which allow you to create buttons and draw images based on information given by the Arduino.
So here I am making my first steps in Processing , and I hope you join me in my journey !
Let’s check out the official website : Getting started with Processing
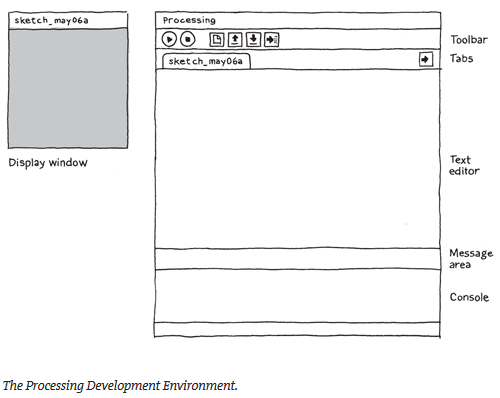
I have already downloaded and installed the software (windows doens’t require instalation). So if everything went well you should be able to see some thing like this :

To be accurate the display window didn’t show up. BE PATIENT WE WILL GET IT SOON !!
Following the tutorial , it’s time to type (or copy paste hahaha) the first code.
ellipse(50, 50, 80, 80);
// ellipse (x,y,width,height)
// (x,y) position of the ellipse
My first impression is that I saw that code in JavaScript. (I learned that months ago in KhanAcademy , it’s very detailed tutorial that have interactive technic which make learning much easier and fun especially with the challenges. Khan academy is open for everyone with active community which is ready to help.Honestly, the courses, explanation and my focus level got worse when I reached the OOP. That’s the weak point of that tutorial and they should fix it probably. Well that’s my opinion and I will be happy to hear yours)
And here the display window will appear when we press “run” button. yeah I told you be patient !
 (such small window, don’t worry the size can be changed … I guess)
At this point and by what I saw in the tutorial of JS, the display can be animated and interactive. Trust me, that will be awesome ! ok back to work…
As I expected, the tutorial jumped on that part. Everyone who know JS see why is that.
void setup()
{
  size(480, 120); // size of the screen ; I told you it can be modified
}
void draw() {     // loop of drawing so the program keep drawing
  if (mousePressed) {
    fill(0);      //fill(a,b,c) : (a,b,c) are variables (from 0 to 255)
                  //define the color that will fill the ellipse
  } else {
    fill(255);
  }
  ellipse(mouseX, mouseY, 80, 80); //(mouseX,mouseY)the mouse in X and Y axes
}
Now you understand the code and probably you are imagining the possibilities. So if we continue to explore the Processing Development Environment (or PDE), we will notice this important button
![]() export : export your code as application
export : export your code as application
I need to copy paste the explanation of the original tutorial because it’s full of useful information :
In addition to exporting your code as applications, you can switch to a different mode within Processing to export to other platforms. For example, download and change to JavaScript Mode to export HTML5 Canvas and WebGL. Change to Android mode to export application for Android phones and tablets. These modes both need to be added before they can be used. Select “Add Mode…” from the menu that says “Java” in the upper-right corner of the Processing Development Environment.
These were really good information but “Arduino” wasn’t mentioned thougth.
That was the end of the online “Getting Started” and I guess it wasn’t enough , right ? The official website proposed also Processing Overview. It explains further the abilities of this IDE. If you want to know more about Processing I highly recommend reading the overview in that link. (probably I’m going to resume it later)
I believe this is important part but I want to focus on how to link Arduino with Processing. So that’s all for today and I hope you enjoyed your time with me as I did. See you again in part 2.
[Please don’t be shy ! comment and follow me that means a lot to me ]
Mohamed Amine Aguir